
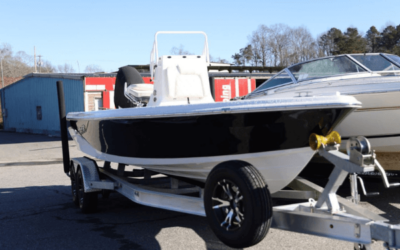
Outboard boat motors are reliable, efficient, simple to maintain, provide lots of horsepower, and are easy to upgrade. Outboard motor maintenance is simplified in this easy-to-follow checklist. Learn how to properly assess your outboard motor before every outing, and how to maintain your outboard motor throughout the year.
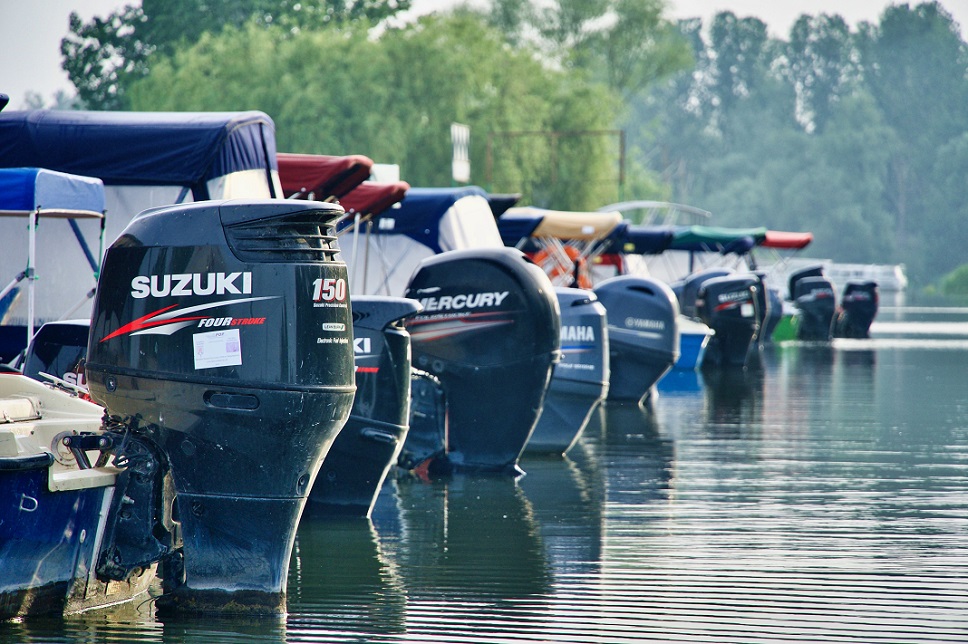
Outboard motors are reliable and efficient. Mercury, Yamaha, and Suzuki are among the best quality brands of outboard motors.
#1 CHECK YOUR FUEL AND SUPPLY LINES
The first thing before starting your engine is to inspect your fuel tank and fuel supply lines. Be sure there are no cracks or leaks in the squeeze bulb, hoses, or connections. Make certain the hose connections are seated properly on both the tank and motor.
If you use your boat infrequently, use a fuel stabilizer throughout the year to prevent water contaminating your fuel. Storing your tank full with fuel is a good way to minimize impacts from moisture.
#2 CHECK OIL AND DO A VISUAL INSPECTION
Next, open your outboard motor engine cover and check your oil level. Inspect the engine closely for any leaks of oil, fuel, or the cooling system. Give a visual inspection of the wiring for any loose connections or corrosion. If everything checks out, put your cover back on and be sure it’s latched securely.

Remove the outboard cover and check the oil level. Do a visual inspection for fluid leaks or any loose or corroded electrical connections.
#3 CHECK BATTERY AND CONNECTIONS
Next give the battery a visual check. Is it secure? Are the terminals tight? Are the terminals free from corrosion? If there’s corrosion, mix baking soda and water and scrub the terminals clean with a toothbrush or small wire brush, and then rinse with clean water.

Visually check the battery connections are tight and free of corrosion. Make sure the battery is covered and secure.
Check the electrical wires that lead from the battery to your outboard motor and make sure that they have integrity and are secure.
#4 INSPECT POWER TRIM AND STEERING HYDRAULICS
Look at the outside of your outboard motor, inspect the hydraulic rams and seals for both your power trim and your steering. Make sure the seals are not cracked, and the arms are not rusted. If they show rust, polish off the rust and apply a spray lubricant to displace water.

Inspect your steering hydraulics and trim hydraulics for cracked seals or leaks. Inspect the rods for rust and polish if necessary.
If your seals are cracked, you will eventually leak hydraulic fluid, and lose pressure. Take your boat to your local boat repair shop like lakesidemarine.com early to fix this issue before it becomes a serious problem.
#5 CHECK THE FLOW OF COOLING WATER
Once your engine is started, visually inspect that a steady stream of cooling water is being emitted from the engine. If the stream is weak, check that the intake is not blocked with sand or debris. Sometimes a small piece of wire to clean the inlet hole is all it takes to restore full flow.
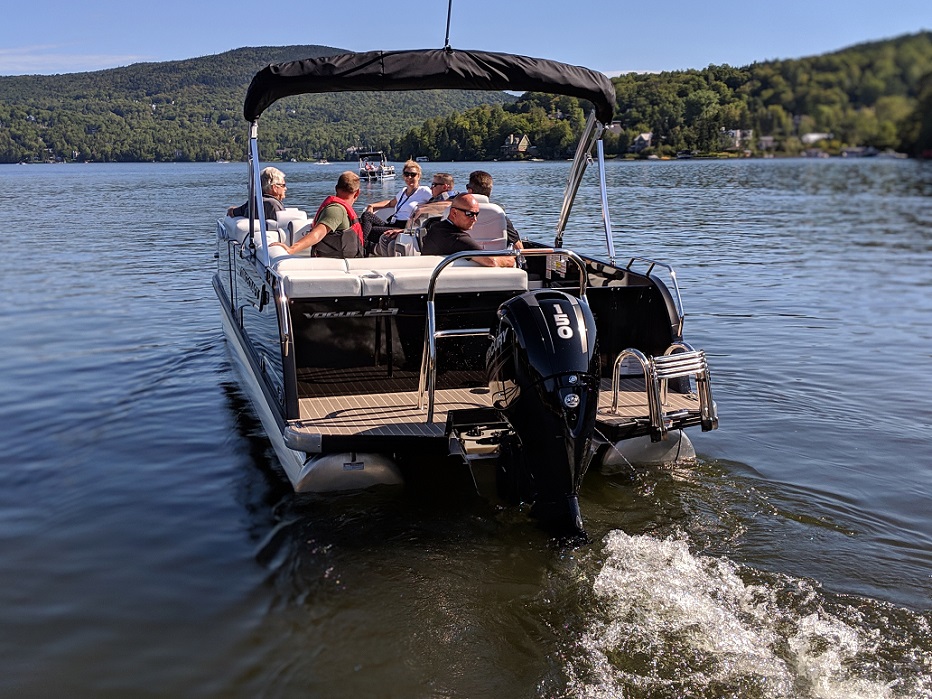
Regularly check for a steady stream of cooling water squirting from the motor to avoid overheating.
If it’s your first start-up in the springtime, and you don’t have good flow, it is possible that you need to change the rubber impeller that pumps the water to cool your engine. Don’t run an engine with low flow. You’ll overheat and damage the engine.
#6 CHANGE YOUR ENGINE OIL
Clean oil is the lifeblood of any engine. Change your oil and filter at least once a year, preferably in the fall before storage. If you are a frequent boater, change your oil once mid-season as well. You can use a service like LM same-day oil change to make this service easy and on schedule.
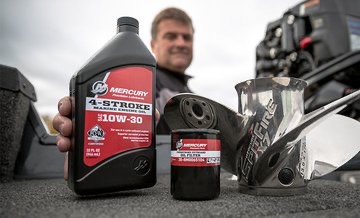
Fresh oil and a new filter keeps your outboard motor performing at its best. For long engine life, replace your oil every 50 hours of use.
#7 DRAIN AND REPLACE THE LOWER UNIT LUBE YEARLY
Ideally, this service is performed in the fall, see Lakeside Marine’s fall boat maintenance specials By doing this maintenance in the fall, the lower unit has no moisture or contaminates while being stored for winter.
There are two plugs for the lower unit, an upper and a lower screw. Remove both screws and let the gear oil drain fully. Then fill the unit with gear oil from the lower screw hole by squeezing the bottle, or using a pump until it flows out the top hole. Replace the upper plug first, and then the lower plug.
#8 PERIODICALLY REPLACE THE IMPELLER
Another fall boat service item is to periodically change the impeller that pumps the cooling water. Saltwater users should change the impeller every fall. Freshwater users may consider doing this every other year for peace of mind.

Periodically replace your impeller that pumps the cooling water. Avoid costly overheats by performing this required maintenance once a year for saltwater, and every two years for fresh water.
#9 WINTERIZE YOUR ENGINE
If you live in a cold climate, it is essential to winterize your motor. First, treat your fuel with a fuel stabilizer and fill your fuel tank full to minimize condensation and contaminated fuel.
Second, run your engine and feed a glycol-based antifreeze into the cooling water intake by submersing it in a bucket of antifreeze, or use a hose and pump. This will displace any water in the cooling system so it won’t freeze and cause damage. Run your motor long enough to pull the fuel stabilizer throughout the entire fuel system.
Third, disconnect your battery cables, and preferably store your battery indoors in a warm place. Put a battery charger on it mid-winter and before reinstallation in the springtime. If you do this, your battery will last a long time.
If you want the peace of mind of a professional mechanic performing your outboard motor winterization, check out Lakeside Marine’s boat winterization specials.
Winterize your outboard before the first cold snap. Change the oil and do a lower unit gear oil change at the same time.
#10 ESSENTIAL OUTBOARD MAINTENANCE FOR SALTWATER
If you run your motor in salt water, after every use you need to take a freshwater hose and flush your cooling system to minimize blockage and corrosion. Then hose off the entirety of the outside of the motor.
For outboards run in saltwater you will also need to periodically inspect and replace your anodes or zincs. These are pieces of aluminum or zinc that are attached to your motor at strategic places that minimize corrosion to the metal parts of your motor both inside and out.

For outboards run in salt water, periodically replace the anodes or “zincs”. The anodes protect the metal components from corrosion.
These outboard motor maintenance practices are easy to follow. If you do these simple things, your outboard motor will perform best and will last for many years to come.


We are a group of volunteers and starting a new scheme in our community. Your website offered us with valuable information to work on. You have done an impressive job and our whole community will be thankful to you.
Oh my goodness! a tremendous article dude. Thank you Nevertheless I am experiencing difficulty with ur rss . Don抰 know why Unable to subscribe to it. Is there anyone getting identical rss drawback? Anybody who is aware of kindly respond. Thnkx
I just like the helpful info you supply for your articles. I will bookmark your weblog and check again here regularly. I am moderately sure I抣l learn many new stuff proper right here! Best of luck for the next!
555
I don’t think the title of your article matches the content lol. Just kidding, mainly because I had some doubts after reading the article.
Your article helped me a lot, is there any more related content? Thanks!
Your point of view caught my eye and was very interesting. Thanks. I have a question for you.
Can you be more specific about the content of your article? After reading it, I still have some doubts. Hope you can help me.
Thanks for sharing. I read many of your blog posts, cool, your blog is very good.
I don’t think the title of your article matches the content lol. Just kidding, mainly because I had some doubts after reading the article.
Your article helped me a lot, is there any more related content? Thanks!
Thank you for your sharing. I am worried that I lack creative ideas. It is your article that makes me full of hope. Thank you. But, I have a question, can you help me?
Your article helped me a lot, is there any more related content? Thanks!
Thank you for your sharing. I am worried that I lack creative ideas. It is your article that makes me full of hope. Thank you. But, I have a question, can you help me?
Can you be more specific about the content of your article? After reading it, I still have some doubts. Hope you can help me.
Your article helped me a lot, is there any more related content? Thanks!
Your point of view caught my eye and was very interesting. Thanks. I have a question for you.
Thank you for your sharing. I am worried that I lack creative ideas. It is your article that makes me full of hope. Thank you. But, I have a question, can you help me?
Can you be more specific about the content of your article? After reading it, I still have some doubts. Hope you can help me.
I don’t think the title of your article matches the content lol. Just kidding, mainly because I had some doubts after reading the article.
Thanks for sharing. I read many of your blog posts, cool, your blog is very good.
Your article helped me a lot, is there any more related content? Thanks!
Searching for trusted roof installation in Lancaster? Roof Installation Pros provides expert services across all roofing styles. Their experienced team guarantees strong, lasting installations that enhance your home’s protection and market value. Excellent service, always on time and within budget.
Get reliable roof installation services in Lancaster with Roof Installation Pros. Whether it’s a new roof or a replacement, their experienced crew delivers quality craftsmanship that lasts. Known for fair pricing and dependable results that boost home value—your roof is in safe hands.
Can you be more specific about the content of your article? After reading it, I still have some doubts. Hope you can help me.
Thanks for sharing. I read many of your blog posts, cool, your blog is very good. https://www.binance.com/en-ZA/register?ref=JHQQKNKN
Your point of view caught my eye and was very interesting. Thanks. I have a question for you.
I don’t think the title of your article matches the content lol. Just kidding, mainly because I had some doubts after reading the article.
Thanks for sharing. I read many of your blog posts, cool, your blog is very good.
Thank you for your sharing. I am worried that I lack creative ideas. It is your article that makes me full of hope. Thank you. But, I have a question, can you help me? https://accounts.binance.info/en-IN/register?ref=UM6SMJM3
Your article helped me a lot, is there any more related content? Thanks!
Thank you for your sharing. I am worried that I lack creative ideas. It is your article that makes me full of hope. Thank you. But, I have a question, can you help me?
Your article helped me a lot, is there any more related content? Thanks!
Your point of view caught my eye and was very interesting. Thanks. I have a question for you.
Can you be more specific about the content of your article? After reading it, I still have some doubts. Hope you can help me.
Your point of view caught my eye and was very interesting. Thanks. I have a question for you.
**mindvault**
mindvault is a premium cognitive support formula created for adults 45+. It’s thoughtfully designed to help maintain clear thinking
**mind vault**
mind vault is a premium cognitive support formula created for adults 45+. It’s thoughtfully designed to help maintain clear thinking
Thanks for sharing. I read many of your blog posts, cool, your blog is very good.
**glpro**
glpro is a natural dietary supplement designed to promote balanced blood sugar levels and curb sugar cravings.
**sugarmute**
sugarmute is a science-guided nutritional supplement created to help maintain balanced blood sugar while supporting steady energy and mental clarity.
**vitta burn**
vitta burn is a liquid dietary supplement formulated to support healthy weight reduction by increasing metabolic rate, reducing hunger, and promoting fat loss.
**synaptigen**
synaptigen is a next-generation brain support supplement that blends natural nootropics, adaptogens
**glucore**
glucore is a nutritional supplement that is given to patients daily to assist in maintaining healthy blood sugar and metabolic rates.
**prodentim**
prodentim an advanced probiotic formulation designed to support exceptional oral hygiene while fortifying teeth and gums.
**nitric boost**
nitric boost is a dietary formula crafted to enhance vitality and promote overall well-being.
**wildgut**
wildgutis a precision-crafted nutritional blend designed to nurture your dog’s digestive tract.
**sleep lean**
sleeplean is a US-trusted, naturally focused nighttime support formula that helps your body burn fat while you rest.
**mitolyn**
mitolyn a nature-inspired supplement crafted to elevate metabolic activity and support sustainable weight management.
**yusleep**
yusleep is a gentle, nano-enhanced nightly blend designed to help you drift off quickly, stay asleep longer, and wake feeling clear.
**zencortex**
zencortex contains only the natural ingredients that are effective in supporting incredible hearing naturally.
**breathe**
breathe is a plant-powered tincture crafted to promote lung performance and enhance your breathing quality.
**prostadine**
prostadine is a next-generation prostate support formula designed to help maintain, restore, and enhance optimal male prostate performance.
**pineal xt**
pinealxt is a revolutionary supplement that promotes proper pineal gland function and energy levels to support healthy body function.
**energeia**
energeia is the first and only recipe that targets the root cause of stubborn belly fat and Deadly visceral fat.
**prostabliss**
prostabliss is a carefully developed dietary formula aimed at nurturing prostate vitality and improving urinary comfort.
**boostaro**
boostaro is a specially crafted dietary supplement for men who want to elevate their overall health and vitality.
**potentstream**
potentstream is engineered to promote prostate well-being by counteracting the residue that can build up from hard-water minerals within the urinary tract.
**hepatoburn**
hepatoburn is a premium nutritional formula designed to enhance liver function, boost metabolism, and support natural fat breakdown.
**hepato burn**
hepato burn is a potent, plant-based formula created to promote optimal liver performance and naturally stimulate fat-burning mechanisms.
**flowforce max**
flowforce max delivers a forward-thinking, plant-focused way to support prostate health—while also helping maintain everyday energy, libido, and overall vitality.
**neurogenica**
neurogenica is a dietary supplement formulated to support nerve health and ease discomfort associated with neuropathy.
**cellufend**
cellufend is a natural supplement developed to support balanced blood sugar levels through a blend of botanical extracts and essential nutrients.
**prodentim**
prodentim is a forward-thinking oral wellness blend crafted to nurture and maintain a balanced mouth microbiome.
**revitag**
revitag is a daily skin-support formula created to promote a healthy complexion and visibly diminish the appearance of skin tags.
Thank you for your sharing. I am worried that I lack creative ideas. It is your article that makes me full of hope. Thank you. But, I have a question, can you help me? https://www.binance.info/zh-TC/register?ref=DCKLL1YD
I don’t think the title of your article matches the content lol. Just kidding, mainly because I had some doubts after reading the article.
Thank you for your sharing. I am worried that I lack creative ideas. It is your article that makes me full of hope. Thank you. But, I have a question, can you help me? https://www.binance.info/en-IN/register?ref=A80YTPZ1
Your point of view caught my eye and was very interesting. Thanks. I have a question for you. https://accounts.binance.com/kz/register-person?ref=K8NFKJBQ
keobovn, huh? This one is kinda new to me. Giving it a try. It looks alright so far, let’s see if it hits the spot! Not ready to give a final verdict, but will check here again to share how the experience goes.
**aquasculpt**
aquasculpt is a premium fat-burning supplement meticulously formulated to accelerate your metabolism and increase your energy output.
**backbiome**
backbiome is a naturally crafted, research-backed daily supplement formulated to gently relieve back tension and soothe sciatic discomfort.
**boostaro**
boostaro is a specially crafted dietary supplement for men who want to elevate their overall health and vitality.
**aquasculpt**
aquasculpt is a revolutionary supplement crafted to aid weight management by naturally accelerating metabolism
**hepato burn**
hepatoburn is a high-quality, plant-forward dietary blend created to nourish liver function, encourage a healthy metabolic rhythm, and support the bodys natural fat-processing pathways.
**vivalis**
vivalis is a premium natural formula created to help men feel stronger, more energetic, and more confident every day.
Thanks for sharing. I read many of your blog posts, cool, your blog is very good. https://accounts.binance.info/ru-UA/register?ref=JVDCDCK4
**alpha boost**
alpha boost for men, feeling strong, energized, and confident is closely tied to overall quality of life. However, with age, stress, and daily demands
**nitric boost**
nitric boost is a daily wellness blend formulated to elevate vitality and support overall performance.
**synadentix**
synadentix is a dental health supplement created to nourish and protect your teeth and gums with a targeted combination of natural ingredients
**glycomute**
glycomute is a natural nutritional formula carefully created to nurture healthy blood sugar levels and support overall metabolic performance.
**nervecalm**
nervecalm is a high-quality nutritional supplement crafted to promote nerve wellness, ease chronic discomfort, and boost everyday vitality.
**glpro**
glpro is a natural dietary supplement designed to promote balanced blood sugar levels and curb sugar cravings.
**yu sleep**
yusleep is a gentle, nano-enhanced nightly blend designed to help you drift off quickly, stay asleep longer, and wake feeling clear
**balmorex pro**
balmorex is an exceptional solution for individuals who suffer from chronic joint pain and muscle aches.
**prodentim**
prodentim is a distinctive oral-care formula that pairs targeted probiotics with plant-based ingredients to encourage strong teeth
**mindvault**
mindvault is a premium cognitive support formula created for adults 45+.
**vitrafoxin**
vitrafoxin is a premium brain enhancement formula crafted with natural ingredients to promote clear thinking, memory retention, and long-lasting mental energy.
**femipro**
femipro is a dietary supplement developed as a natural remedy for women facing bladder control issues and seeking to improve their urinary health.
**provadent**
provadent is a newly launched oral health supplement that has garnered favorable feedback from both consumers and dental professionals.
**sleeplean**
is a US-trusted, naturally focused nighttime support formula that helps your body burn fat while you rest.
**glucore**
glucore is a nutritional supplement that is given to patients daily to assist in maintaining healthy blood sugar and metabolic rates.
**tonic greens**
tonic greens is a cutting-edge health blend made with a rich fusion of natural botanicals and superfoods, formulated to boost immune resilience and promote daily vitality.
**prostavive**
prostavive Maintaining prostate health is crucial for mens overall wellness, especially as they grow older.
**vertiaid**
vertiaid is a high-quality, natural formula created to support stable balance, enhance mental sharpness, and alleviate feelings of dizziness
**sugarmute**
sugarmute is a science-guided nutritional supplement created to help maintain balanced blood sugar while supporting steady energy and mental clarity
**primebiome**
The natural cycle of skin cell renewal plays a vital role in maintaining a healthy and youthful appearance by shedding old cells and generating new ones.
Your article helped me a lot, is there any more related content? Thanks!
**gluco6**
gluco6 is a natural, plant-based supplement designed to help maintain healthy blood sugar levels.
**oradentum**
oradentum is a comprehensive 21-in-1 oral care formula designed to reinforce enamel, support gum vitality, and neutralize bad breath using a fusion of nature-derived, scientifically validated compounds.
Your article helped me a lot, is there any more related content? Thanks!
**biodentex**
biodentex is a dentist-endorsed oral wellness blend crafted to help fortify gums, defend enamel, and keep your breath consistently fresh.
**wildgut**
wildgut is a precision-crafted nutritional blend designed to nurture your dogs digestive tract.
**mitolyn**
mitolyn is a plant-forward blend formulated to awaken metabolic efficiency and support steady, sustainable weight management.
Can you be more specific about the content of your article? After reading it, I still have some doubts. Hope you can help me.
**prostadine**
prostadine concerns can disrupt everyday rhythm with steady discomfort, fueling frustration and a constant hunt for dependable relief.
**ignitra**
ignitra is a premium, plant-based dietary supplement created to support healthy metabolism, weight management, steady energy, and balanced blood sugar as part of an overall wellness routine
**finessa**
Finessa is a natural supplement made to support healthy digestion, improve metabolism, and help you achieve a flatter belly.
**neuro sharp**
neurosharp is a next-level brain and cognitive support formula created to help you stay clear-headed, improve recall, and maintain steady mental performance throughout the day.
I don’t think the title of your article matches the content lol. Just kidding, mainly because I had some doubts after reading the article.
Your article helped me a lot, is there any more related content? Thanks! https://www.binance.com/register?ref=IHJUI7TF
Thanks for sharing. I read many of your blog posts, cool, your blog is very good. https://www.binance.info/register?ref=IHJUI7TF
SlotVIP777Login is good for getting straight into the games. The variety keeps things interesting. Ready to try your luck? Log in here: slotvip777login
Yo, 55lllogin just got on my radar. Seems alright so far. Easy to navigate the site, and the bonuses are pretty tempting. Hope it’s not a scam LOL. I’ll update after I tested more. Check out 55lllogin for yourselves.
Looking for a working 12bet link? 12betlink is the place to be! Always find the most updated access thanks to them. No more broken links! Check the 12betlink website now!
Can you be more specific about the content of your article? After reading it, I still have some doubts. Hope you can help me. https://accounts.binance.com/pl/register?ref=UM6SMJM3
Your point of view caught my eye and was very interesting. Thanks. I have a question for you. https://www.binance.info/sk/register?ref=WKAGBF7Y
Thank you for your sharing. I am worried that I lack creative ideas. It is your article that makes me full of hope. Thank you. But, I have a question, can you help me?
Your point of view caught my eye and was very interesting. Thanks. I have a question for you.
I don’t think the title of your article matches the content lol. Just kidding, mainly because I had some doubts after reading the article.
Thank you for your sharing. I am worried that I lack creative ideas. It is your article that makes me full of hope. Thank you. But, I have a question, can you help me?
Your article helped me a lot, is there any more related content? Thanks!
Thanks for sharing. I read many of your blog posts, cool, your blog is very good.
Thanks for sharing. I read many of your blog posts, cool, your blog is very good.
Thank you for your sharing. I am worried that I lack creative ideas. It is your article that makes me full of hope. Thank you. But, I have a question, can you help me? https://www.binance.com/register?ref=IXBIAFVY
I don’t think the title of your article matches the content lol. Just kidding, mainly because I had some doubts after reading the article.
Thanks for sharing. I read many of your blog posts, cool, your blog is very good.
**prostafense**
ProstAfense is a premium, doctor-crafted supplement formulated to maintain optimal prostate function, enhance urinary performance, and support overall male wellness.
**nerve calm**
NerveCalm is a high-quality nutritional supplement crafted to promote nerve wellness, ease chronic discomfort, and boost everyday vitality.
Thank you for your sharing. I am worried that I lack creative ideas. It is your article that makes me full of hope. Thank you. But, I have a question, can you help me? https://www.binance.com/join?ref=IHJUI7TF
**mitolyn**
Mitolyn is a carefully developed, plant-based formula created to help support metabolic efficiency and encourage healthy, lasting weight management.
Your article helped me a lot, is there any more related content? Thanks! https://www.binance.com/register?ref=IXBIAFVY
I don’t think the title of your article matches the content lol. Just kidding, mainly because I had some doubts after reading the article. https://accounts.binance.com/sv/register-person?ref=GQ1JXNRE
Thanks for sharing. I read many of your blog posts, cool, your blog is very good.
Your article helped me a lot, is there any more related content? Thanks!
Your article helped me a lot, is there any more related content? Thanks!
Thanks for sharing. I read many of your blog posts, cool, your blog is very good. https://accounts.binance.info/fr/register-person?ref=T7KCZASX
Your point of view caught my eye and was very interesting. Thanks. I have a question for you.
Your point of view caught my eye and was very interesting. Thanks. I have a question for you.
Your point of view caught my eye and was very interesting. Thanks. I have a question for you. https://accounts.binance.com/zh-TC/register-person?ref=DCKLL1YD
Thank you for your sharing. I am worried that I lack creative ideas. It is your article that makes me full of hope. Thank you. But, I have a question, can you help me?
Your point of view caught my eye and was very interesting. Thanks. I have a question for you. https://accounts.binance.com/en/register-person?ref=JHQQKNKN
Your point of view caught my eye and was very interesting. Thanks. I have a question for you. https://accounts.binance.com/en-ZA/register-person?ref=B4EPR6J0
Can you be more specific about the content of your article? After reading it, I still have some doubts. Hope you can help me.
Your point of view caught my eye and was very interesting. Thanks. I have a question for you.
Your point of view caught my eye and was very interesting. Thanks. I have a question for you. https://accounts.binance.info/da-DK/register?ref=V3MG69RO
Thank you for your sharing. I am worried that I lack creative ideas. It is your article that makes me full of hope. Thank you. But, I have a question, can you help me?
Thanks for sharing. I read many of your blog posts, cool, your blog is very good.
I don’t think the title of your article matches the content lol. Just kidding, mainly because I had some doubts after reading the article.
Your article helped me a lot, is there any more related content? Thanks!
Thanks for sharing. I read many of your blog posts, cool, your blog is very good.
I don’t think the title of your article matches the content lol. Just kidding, mainly because I had some doubts after reading the article.
Your article helped me a lot, is there any more related content? Thanks!
Your point of view caught my eye and was very interesting. Thanks. I have a question for you. https://accounts.binance.com/register/person?ref=JW3W4Y3A
Your article helped me a lot, is there any more related content? Thanks! https://www.binance.bh/register?ref=IXBIAFVY
555
555
555
555
555
555
555
555
555
1CZWL3MF
if(now()=sysdate(),sleep(15),0)
0″XOR(if(now()=sysdate(),sleep(15),0))XOR”Z
-1; waitfor delay ‘0:0:15’ —
1 waitfor delay ‘0:0:15’ —
-5 OR 72=(SELECT 72 FROM PG_SLEEP(15))–
-1)) OR 771=(SELECT 771 FROM PG_SLEEP(15))–
e5Ir570F’) OR 886=(SELECT 886 FROM PG_SLEEP(15))–
bkbVbW59′)) OR 303=(SELECT 303 FROM PG_SLEEP(15))–
555*DBMS_PIPE.RECEIVE_MESSAGE(CHR(99)||CHR(99)||CHR(99),15)
555’||DBMS_PIPE.RECEIVE_MESSAGE(CHR(98)||CHR(98)||CHR(98),15)||’
Thank you for your sharing. I am worried that I lack creative ideas. It is your article that makes me full of hope. Thank you. But, I have a question, can you help me?
Your point of view caught my eye and was very interesting. Thanks. I have a question for you.
Your point of view caught my eye and was very interesting. Thanks. I have a question for you. https://www.binance.bh/futures/ref?code=QCGZMHR6
Thank you for your sharing. I am worried that I lack creative ideas. It is your article that makes me full of hope. Thank you. But, I have a question, can you help me? https://accounts.binance.bh/register/person?ref=IHJUI7TF
Your point of view caught my eye and was very interesting. Thanks. I have a question for you. https://www.binance.bh/register?ref=QCGZMHR6
Your point of view caught my eye and was very interesting. Thanks. I have a question for you.
Your point of view caught my eye and was very interesting. Thanks. I have a question for you.
Your point of view caught my eye and was very interesting. Thanks. I have a question for you.
Thanks for sharing. I read many of your blog posts, cool, your blog is very good.
Can you be more specific about the content of your article? After reading it, I still have some doubts. Hope you can help me.
Can you be more specific about the content of your article? After reading it, I still have some doubts. Hope you can help me.
I don’t think the title of your article matches the content lol. Just kidding, mainly because I had some doubts after reading the article. Тегн акаунт жасау
Thank you for your sharing. I am worried that I lack creative ideas. It is your article that makes me full of hope. Thank you. But, I have a question, can you help me?
Thank you for your sharing. I am worried that I lack creative ideas. It is your article that makes me full of hope. Thank you. But, I have a question, can you help me?